If you are using a geotextile protection
underlay (highly recommended) it will be supplied in two pieces, a base
and a wall section. The base is simply placed on the floor as evenly as
possible. The wall underlay will then be temporarily hung in place until
the tank liner is installed.
Hang the geotextile protection underlay
along the wall in four different places (best to use non-permanent
fixing, such as heavy duty tape); this can be done by using the 3, 6, 9
and 12 o’clock positions or in the 4 corners for square or rectangular
tanks.
For open top tanks, hang the liner over
the edge. It is often a good idea to drill all of the fixings positions
prior to hanging the liner. (Ensure all drill swarfetc is removed before
hanging geotextile and liner). Do not worry about the rest of the
geotextile wall as this can be hung at the same time as hanging the
liner wall. If you do pre-drill all of the fixing locations for hanging
the liner, make sure that there is a gap of at least 200mm between each
fixing location.
The wall underlay will also overlap the
base underlay by a small amount. You can tape any excess floor
geotextile to the wall and overlap any excess material from the wall and
or floor.
Put pressure on the geotextile adjacent
to any hazards to make sure none of the hazards penetrate the
geotextile. If the hazard pierces or is likely to pierce the geotextile,
remove the puncture point.
Securing The New Liner
There are two ways to secure the tank liner installation,
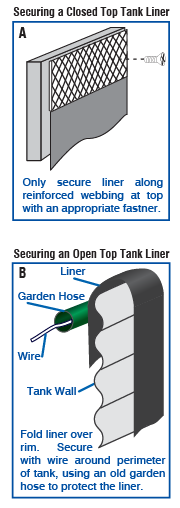
depending on the type of tank you have. With open top tanks, the liner
is folded over the edge by about 150 mm and secured around the outside
with wire (in the case of corrugated tanks).
Carefully unroll the liner on the tank
floor and open the liner up, making sure that the centre of the liner
(marked with 300mm diameter circle) is exactly in the centre of the
tank. Take care when unfolding the liner and ensure that you unfold each
fold one at a time. Make sure that the wall to base seam (the welded
seam that continuously goes all the way around the tank) is pushed up
against the floor/wall juncture (where wall meets the floor of the
tank).
SECURING A LINER IN A CLOSED TOP TANK – Diagram A
With closed top water tanks, the liner
can be secured with rivets, self- tapping screws or concrete wall
anchors, depending on the type of tank. Mount or screw through the
webbing.
Start hanging the liner wall by using the
same method as you used when hanging the geotextile on the wall the 12,
3, 6 and 9 o’clock positions or the four corners. Ensure that the wall
section is hung vertically. Check to see that the pleats (folds) are
hanging vertically. When you start to hang the rest of the wall, hold
the geotextile underlay wall material behind the liner wall and attach
both of them at the same time.
If the folds (pleats) on the tank liner wall are not vertical then the tank liner will have to be re-adjusted.
At NO POINT is the liner to be under any
tension in any place. The liner is made oversize and should not be
tight, taunt or under load at any point.
SECURING A LINER IN AN OPEN TOP TANK – Diagram B
Check both the inside of the tank as well
as the rim of the outside of the tank for any sharp or protruding
objects that can either damage or puncture your liner. The Geotextile
protection underlay should help protect the liner as much as possible
when it is dropped over the top of the tank.
Once the liner is inside the tank, unroll
the liner and make sure the liner is in place by checking the perimeter
wall to base seam is right in the wall to base join of the tank. Fold
both your Geotextile protection underlay wall and your liner over the
top of the tank, making sure that any wrinkles which appear on the liner
wall during installation are eliminated (pull the liner wall against
the wrinkles).
No comments:
Post a Comment